API Key Management
Role: Member user Last updated: 2026-08-06
An API Key is the credential for calling the platform. It is recommended to create separate Keys for different applications or environments, so you can set independent groups, limits, and source restrictions for each.
For model call names and routing rules, see Call Guide. For Base URL and request examples, see the Developer Guide.
Creating an API Key
- Go to "API Key".
- Click "Create API Key".
- Enter a name and select a routing group (the dialog preselects the first available group by default).
- Optionally configure limits, rate limits, expiration, and IP restrictions.
- Copy and securely save the full Key immediately after submission.
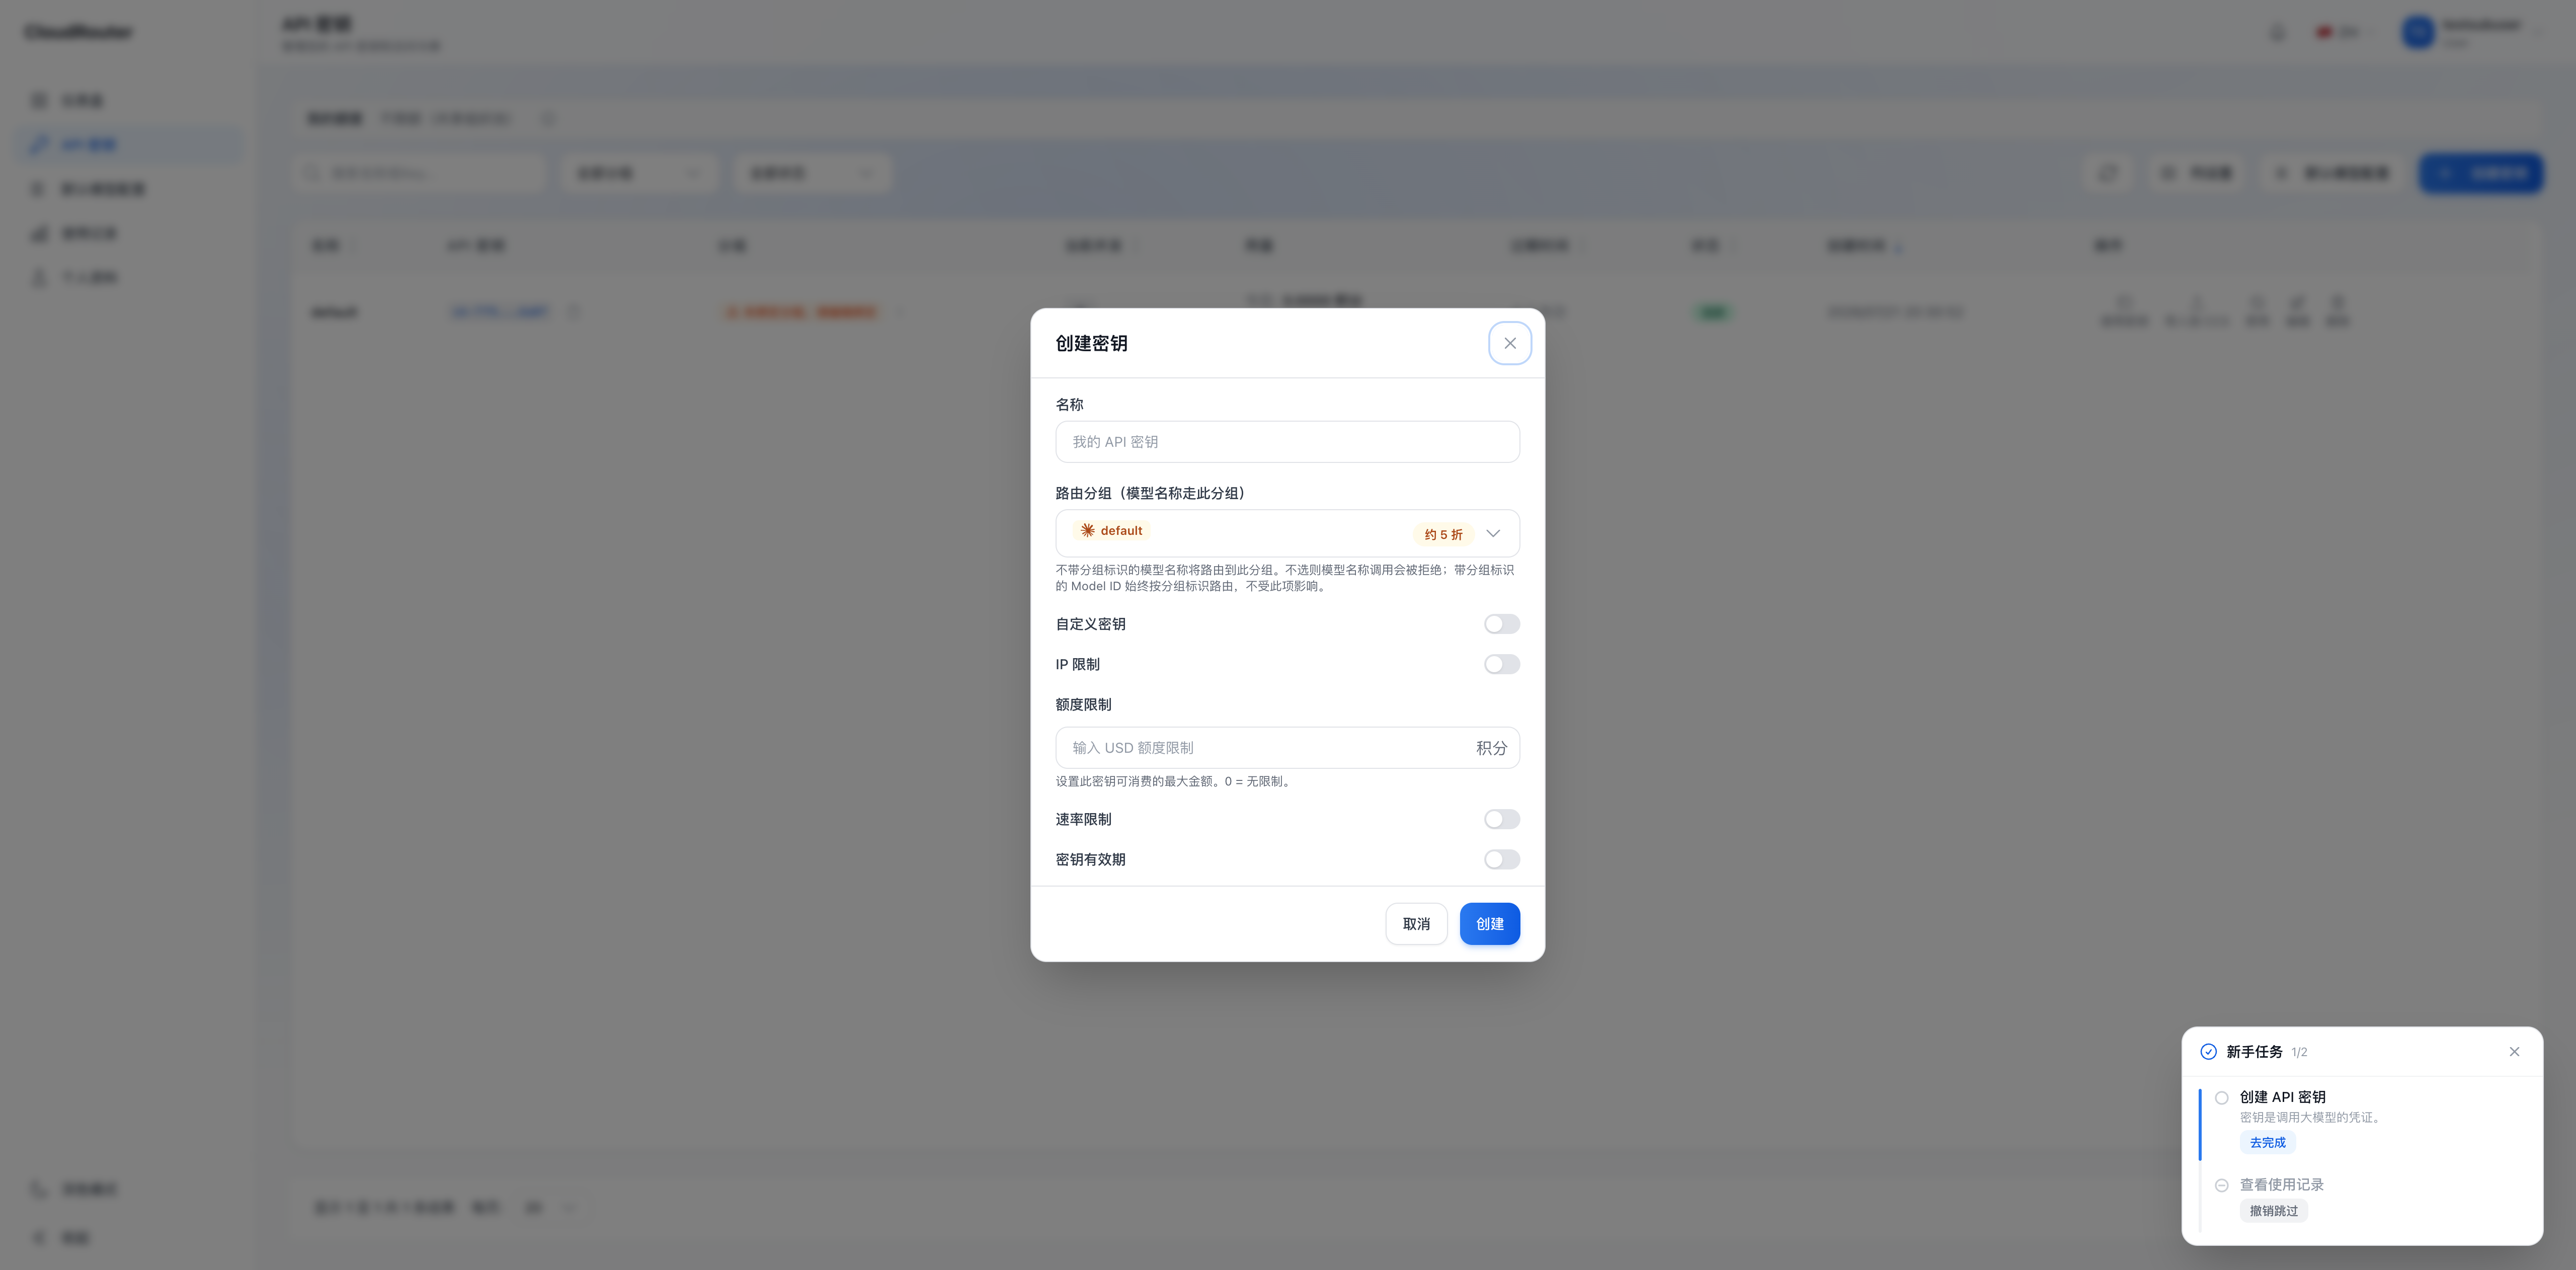
| Field | Description |
|---|---|
| Name | A descriptive name, e.g., "Dev Debug" or "Customer Service App" |
| Routing Group (model names route through this group) | The group that standard model names prioritize; required at creation |
| Custom API Key | Specify the Key value per page rules; typically use the system-generated value |
| Quota Limit | Maximum credits this Key can consume; 0 usually means no separate limit |
| Rate Limit | Maximum credits within 5-hour / daily / 7-day windows, corresponding to the "Key Limit (5 hours) (credits)", "Key Limit (daily) (credits)", and "Key Limit (7 days) (credits)" fields in the UI |
| API Key Expiration | Automatically disabled after expiration |
| IP Restriction | Allow or deny specific network sources |
The full Key is shown only once at creation. If not saved or if a leak is suspected, disable the old Key and create a new one. Do not attempt to recover it from logs or screenshots.
Selecting a Routing Group
The group determines which service scope standard model names prioritize. The dropdown only shows groups that the admin user has assigned to the current member.
The bound group can be changed after creation. If a Key has no bound group, standard model name requests will be rejected. To add a new group, contact the admin user to adjust permissions.
The same model may appear in multiple groups with different pricing or service configurations. Before selecting, you can check the model plaza, call guide, and upstream account status.
Viewing and Managing Keys
The API Key list displays the name, masked API Key, bound group, billing source, usage, current concurrency, expiration, and status by default.
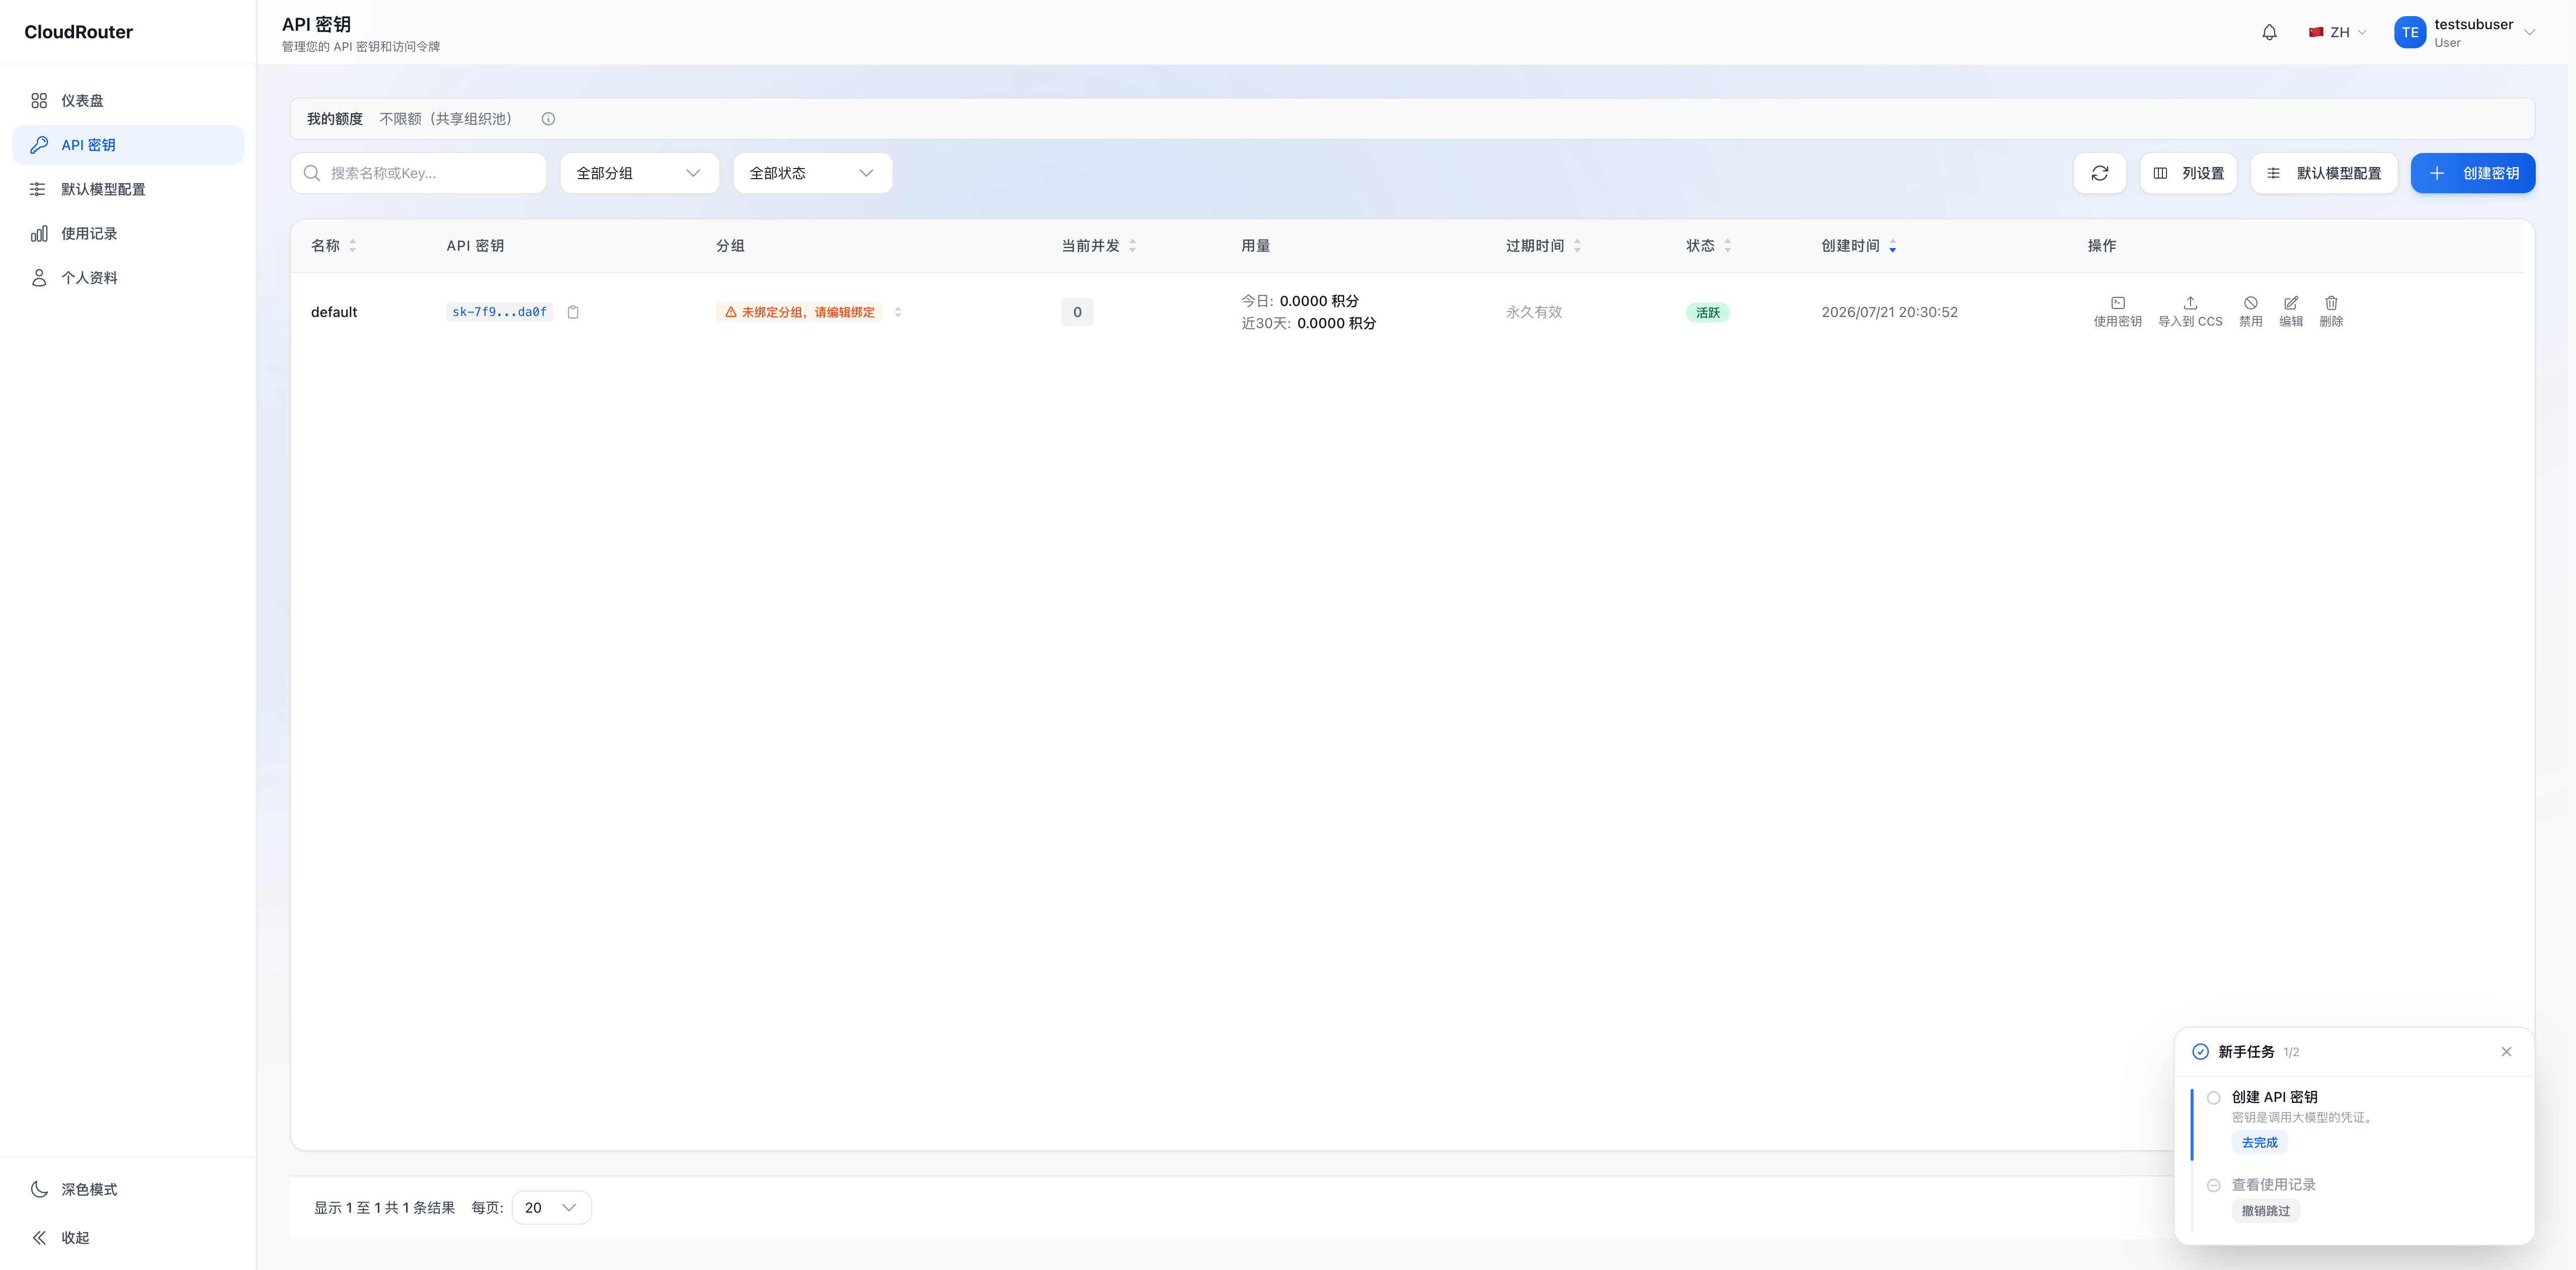
Common operations include:
- Use API Key: View the connection configuration for the current Key.
- Edit: Modify the name, group, and restrictions.
- Disable/Enable: Immediately block or resume subsequent requests.
- Delete: Permanently revoke the Key.
- Column Settings: Show rate limits, last used time, and recent source IP fields.
Some accounts may display additional quick actions. Available features are subject to what the console currently shows.
Determining Whether a Key Is Usable
For a Key to successfully make calls, all of the following must be true:
- The Key is enabled and not expired.
- It is bound to an available group.
- The Key's own quota and rate limits have not been triggered.
- The member's pay-as-you-go quota is still available, or the Key is bound to a valid subscription.
- The organization balance and target upstream account are in normal status.
Pay-as-you-go quota exhaustion does not necessarily affect subscription-bound Keys. You can distinguish them by the "Billing Source" and status fields in the list. See My Subscriptions for detailed rules.
Setting IP Restrictions
IP restrictions are suitable for servers or office networks with fixed source addresses:
- Edit the target Key.
- Enable IP restriction.
- Enter allowed or denied addresses line by line per the page format.
- After saving, test once from both an allowed and a non-allowed source.
Confirm the actual egress IP used by your service before configuring. Dynamic networks, mobile networks, or clients behind proxies are not suitable for fixed IP allowlists, as address changes will cause requests to be rejected.
Key Usage Best Practices
- Use different Keys for development, testing, and production environments.
- Do not share a single Key across different applications or personnel long-term.
- Read Keys from environment variables in configuration files; do not commit them to code repositories.
- Set lower quota limits and shorter expiration for test Keys.
- Regularly check the last used time and source IP.
- Revoke corresponding Keys promptly when personnel leave a project or an application goes offline.
Multiple Keys under the same member share the user quota, but each Key can have its own independent limit.
FAQ
Why can't I see the group I need when creating a Key? The current member has not been granted that group. Contact the admin user to assign it.
Why can't I see the full Key in the list? The full value is shown only once at creation. Disable or delete the old Key and create a new one.
Does creating multiple Keys increase my quota? No. All Key spending counts toward the current member's quota.
What should I do if a Key is leaked? Immediately disable or delete it, then create a new Key and update your application configuration. Also check usage records for any unusual sources or abnormal usage.